Java Concurrency - Collection

这篇博文是Java Concurrency系列博文的第三篇,主要来探索Java中多线程常用到的一些集合类,包括ConcurrentHashMap和BlockingQueue。通过对部分源代码的分析,希望能够帮助理解这些集合类的机制和特点,以便把握他们的正确使用场景。

ConcurrentHashMap

PS:部分内容参考了Java并发编程之ConcurrentHashMap

ConcurrentHashMap是一个线程安全的Hash Table,它的主要功能是提供了一组和HashTable功能相同但是线程安全的方法。ConcurrentHashMap可以做到读取数据不加锁,并且其内部的结构可以让其在进行写操作的时候能够将锁的粒度保持地尽量地小,不用对整个ConcurrentHashMap加锁。

ConcurrentHashMap为了提高本身的并发能力,在内部采用了一个叫做Segment的结构,一个Segment其实就是一个类Hash Table的结构,Segment内部维护了一个链表数组,我们用下面这一幅图来看下ConcurrentHashMap的内部结构:

ConcurrentHashMap

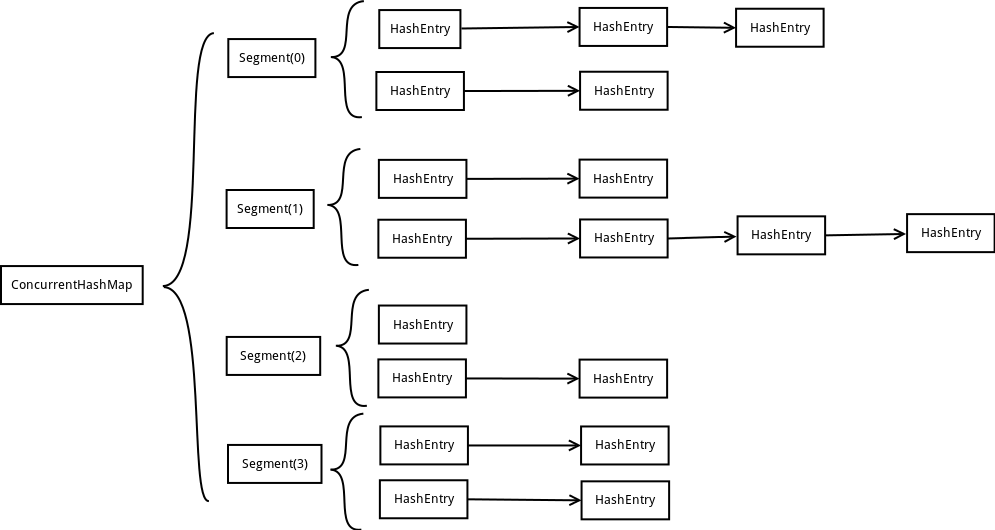
从上面的结构我们可以了解到,ConcurrentHashMap定位一个元素的过程需要进行两次Hash操作,第一次Hash定位到Segment,第二次Hash定位到元素所在的链表的头部,因此,这一种结构的带来的副作用是Hash的过程要比普通的HashMap要长,但是带来的好处是写操作的时候可以只对元素所在的Segment进行加锁即可,不会影响到其他的Segment,这样,在最理想的情况下,ConcurrentHashMap可以最高同时支持Segment数量大小的写操作(刚好这些写操作都非常平均地分布在所有的Segment上),所以,通过这一种结构,ConcurrentHashMap的并发能力可以大大的提高。

Segment

我们再来具体了解一下Segment的数据结构:

java
1
2
3
4
5
6
7
static final class Segment<K,V> extends ReentrantLock implements Serializable {  
transient volatile int count;
transient int modCount;
transient int threshold;
transient volatile HashEntry<K,V>[] table;
final float loadFactor;
}

详细解释一下Segment里面的成员变量的意义:

  • count:Segment中元素的数量
  • modCount:对table的大小造成影响的操作的数量(比如put或者remove操作)
  • threshold:阈值,Segment里面元素的数量超过这个值依旧就会对Segment进行扩容
  • table:链表数组,数组中的每一个元素代表了一个链表的头部
  • loadFactor:负载因子,用于确定threshold

HashEntry

Segment中的元素是以HashEntry的形式存放在链表数组中的,看一下HashEntry的结构:

java
1
2
3
4
5
6
static final class HashEntry<K,V> {  
final K key;
final int hash;
volatile V value;
final HashEntry<K,V> next;
}

可以看到HashEntry的一个特点,除了value以外,其他的几个变量都是final的,这样做是为了防止链表结构被破坏,出现ConcurrentModification的情况。

下面我们来结合源代码来具体分析一下ConcurrentHashMap的实现,先看下初始化方法:

ConcurrentHashMap的初始化

java
1
2
3
4
5
6
7
8
9
10
11
12
13
14
15
16
17
18
19
20
21
22
23
24
25
26
27
28
29
30
31
32

public ConcurrentHashMap(int initialCapacity,
float loadFactor, int concurrencyLevel) {
if (!(loadFactor > 0) || initialCapacity < 0 || concurrencyLevel <= 0)
throw new IllegalArgumentException();

if (concurrencyLevel > MAX_SEGMENTS)
concurrencyLevel = MAX_SEGMENTS;

// Find power-of-two sizes best matching arguments
int sshift = 0;
int ssize = 1;
while (ssize < concurrencyLevel) {
++sshift;
ssize <<= 1;
}
segmentShift = 32 - sshift;
segmentMask = ssize - 1;
this.segments = Segment.newArray(ssize);

if (initialCapacity > MAXIMUM_CAPACITY)
initialCapacity = MAXIMUM_CAPACITY;
int c = initialCapacity / ssize;
if (c * ssize < initialCapacity)
++c;
int cap = 1;
while (cap < c)
cap <<= 1;

for (int i = 0; i < this.segments.length; ++i)
this.segments[i] = new Segment<K,V>(cap, loadFactor);
}

CurrentHashMap的初始化一共有三个参数,一个initialCapacity,表示初始的容量,一个loadFactor,表示负载参数,最后一个是concurrentLevel,代表ConcurrentHashMap内部的Segment的数量,ConcurrentLevel一经指定,不可改变,后续如果ConcurrentHashMap的元素数量增加导致ConrruentHashMap需要扩容,ConcurrentHashMap不会增加Segment的数量,而只会增加Segment中链表数组的容量大小,这样的好处是扩容过程不需要对整个ConcurrentHashMaprehash,而只需要对Segment里面的元素做一次rehash就可以了。

整个ConcurrentHashMap的初始化方法还是非常简单的,先是根据concurrentLevelnewSegment,这里Segment的数量是不大于concurrentLevel的最大的2的指数,就是说Segment的数量永远是2的指数个,这样的好处是方便采用移位操作来进行hash,加快hash的过程。接下来就是根据intialCapacity确定Segment的容量的大小,每一个Segment的容量大小也是2的指数,同样使为了加快hash的过程。

这边需要特别注意一下两个变量,分别是segmentShiftsegmentMask,这两个变量在后面将会起到很大的作用,假设构造函数确定了Segment的数量是2的n次方,那么segmentShift就等于32减去n,而segmentMask就等于2的n次方减一。

ConcurrentHashMap的get操作

前面提到过ConcurrentHashMapget操作是不用加锁的,我们这里看一下其实现:

java
1
2
3
4
public V get(Object key) {  
int hash = hash(key.hashCode());
return segmentFor(hash).get(key, hash);
}

在第三行,segmentFor这个函数用于确定操作应该在哪一个segment中进行,几乎对ConcurrentHashMap的所有操作都需要用到这个函数,我们看下这个函数的实现:

java
1
2
3
final Segment<K,V> segmentFor(int hash) {  
return segments[(hash >>> segmentShift) & segmentMask];
}

这个函数用了位操作来确定Segment,根据传入的hash值向右无符号右移segmentShift位,然后和segmentMask进行与操作,结合我们之前说的segmentShiftsegmentMask的值,就可以得出以下结论:假设Segment的数量是2的n次方,根据元素的hash值的高n位就可以确定元素到底在哪一个Segment中。

在确定了需要在哪一个Segment中进行操作以后,接下来的事情就是调用对应的Segmentget方法:

java
1
2
3
4
5
6
7
8
9
10
11
12
13
14
15
V get(Object key, int hash) {
if (count != 0) { // read-volatile
HashEntry<K,V> e = getFirst(hash);
while (e != null) {
if (e.hash == hash && key.equals(e.key)) {
V v = e.value;
if (v != null)
return v;
return readValueUnderLock(e); // recheck
}
e = e.next;
}
}
return null;
}

先看第二行代码,这里对count进行了一次判断,其中count表示Segment中元素的数量,我们可以来看一下count的定义:

java
1
transient volatile int count;  

可以看到countvolatile的。因为实际上putremove等操作也会更新count的值,所以当竞争发生的时候,volatile的语义可以保证写操作在读操作之前,也就保证了写操作对后续的读操作都是可见的,这样后面get的后续操作就可以拿到完整的元素内容。

然后,在第三行,调用了getFirst方法来取得链表的头部:

java
1
2
3
4
HashEntry<K,V> getFirst(int hash) {  
HashEntry<K,V>[] tab = table;
return tab[hash & (tab.length - 1)];
}

同样,这里也是用位操作来确定链表的头部,hash值和HashTable的长度减一做与操作,最后的结果就是hash值的低n位,其中n是HashTable的长度以2为底的结果。

在确定了链表的头部以后,就可以对整个链表进行遍历,看第4行,取出key对应的value的值,如果拿出的value的值是null,则可能这个key,value对正在put的过程中,如果出现这种情况,那么就加锁来保证取出的value是完整的,如果不是null,则直接返回value。

ConcurrentHashMap的put操作

看完了get操作,再看下put操作,put操作的前面也是确定Segment的过程,这里不再赘述,直接看关键的Segmentput方法:

java
1
2
3
4
5
6
7
8
9
10
11
12
13
14
15
16
17
18
19
20
21
22
23
24
25
26
27
28
29
30
31

V put(K key, int hash, V value, boolean onlyIfAbsent) {
lock();
try {
int c = count;
if (c++ > threshold) // ensure capacity
rehash();
HashEntry<K,V>[] tab = table;
int index = hash & (tab.length - 1);
HashEntry<K,V> first = tab[index];
HashEntry<K,V> e = first;
while (e != null && (e.hash != hash || !key.equals(e.key)))
e = e.next;

V oldValue;
if (e != null) {
oldValue = e.value;
if (!onlyIfAbsent)
e.value = value;
}
else {
oldValue = null;
++modCount;
tab[index] = new HashEntry<K,V>(key, hash, first, value);
count = c; // write-volatile
}
return oldValue;
} finally {
unlock();
}
}

首先对Segmentput操作是加锁完成的,然后在第五行,如果Segment中元素的数量超过了阈值(由构造函数中的loadFactor算出)这需要进行对Segment扩容,并且要进行rehash,关于rehash的过程大家可以自己去了解,这里不详细讲了。

第8和第9行的操作就是getFirst的过程,确定链表头部的位置。

第11行这里的这个while循环是在链表中寻找和要put的元素相同key的元素,如果找到,就直接更新更新keyvalue,如果没有找到,则进入21行这里,生成一个新的HashEntry并且把它加到整个Segment的头部,然后再更新count的值。

ConcurrentHashMap的remove操作

Remove操作的前面一部分和前面的getput操作一样,都是定位Segment的过程,然后再调用Segmentremove方法:

java
1
2
3
4
5
6
7
8
9
10
11
12
13
14
15
16
17
18
19
20
21
22
23
24
25
26
27
28
29
30
31
32
33
V remove(Object key, int hash, Object value) {
lock();
try {
int c = count - 1;
HashEntry<K,V>[] tab = table;
int index = hash & (tab.length - 1);
HashEntry<K,V> first = tab[index];
HashEntry<K,V> e = first;
while (e != null && (e.hash != hash || !key.equals(e.key)))
e = e.next;

V oldValue = null;
if (e != null) {
V v = e.value;
if (value == null || value.equals(v)) {
oldValue = v;
// All entries following removed node can stay
// in list, but all preceding ones need to be
// cloned.
++modCount;
HashEntry<K,V> newFirst = e.next;
for (HashEntry<K,V> p = first; p != e; p = p.next)
newFirst = new HashEntry<K,V>(p.key, p.hash,
newFirst, p.value);
tab[index] = newFirst;
count = c; // write-volatile
}
}
return oldValue;
} finally {
unlock();
}
}

首先remove操作也是确定需要删除的元素的位置,不过这里删除元素的方法不是简单地把待删除元素的前面的一个元素的next指向后面一个就完事了,我们之前已经说过HashEntry中的nextfinal的,一经赋值以后就不可修改,在定位到待删除元素的位置以后,程序就将待删除元素前面的那一些元素全部复制一遍,然后再一个一个重新接到链表上去

ConcurrentHashMap的size操作

在前面的章节中,我们涉及到的操作都是在单个Segment中进行的,但是ConcurrentHashMap有一些操作是在多个Segment中进行,比如size操作,ConcurrentHashMapsize操作也采用了一种比较巧的方式,来尽量避免对所有的Segment都加锁。

前面我们提到了一个Segment中的有一个modCount变量,代表的是对Segment中元素的数量造成影响的操作的次数,这个值只增不减,size操作就是遍历了两次Segment,每次记录Segment的modCount值,然后将两次的modCount进行比较,如果相同,则表示期间没有发生过写入操作,就将原先遍历的结果返回,如果不相同,则把这个过程再重复做一次,如果再不相同,则就需要将所有的Segment都锁住,然后一个一个遍历了,具体的实现大家可以看ConcurrentHashMap的源码。

下面是size方法的具体实现,我们就不在一一分析,感兴趣的读者可以自己分析一下:

java
1
2
3
4
5
6
7
8
9
10
11
12
13
14
15
16
17
18
19
20
21
22
23
24
25
26
27
28
29
30
31
32
33
34
35
36
37
38
39
public int size() {
// Try a few times to get accurate count. On failure due to
// continuous async changes in table, resort to locking.
final Segment<K,V>[] segments = this.segments;
int size;
boolean overflow; // true if size overflows 32 bits
long sum; // sum of modCounts
long last = 0L; // previous sum
int retries = -1; // first iteration isn't retry
try {
for (;;) {
if (retries++ == RETRIES_BEFORE_LOCK) {
for (int j = 0; j < segments.length; ++j)
ensureSegment(j).lock(); // force creation
}
sum = 0L;
size = 0;
overflow = false;
for (int j = 0; j < segments.length; ++j) {
Segment<K,V> seg = segmentAt(segments, j);
if (seg != null) {
sum += seg.modCount;
int c = seg.count;
if (c < 0 || (size += c) < 0)
overflow = true;
}
}
if (sum == last)
break;
last = sum;
}
} finally {
if (retries > RETRIES_BEFORE_LOCK) {
for (int j = 0; j < segments.length; ++j)
segmentAt(segments, j).unlock();
}
}
return overflow ? Integer.MAX_VALUE : size;
}

BlockingQueue

多线程环境中,通过队列可以很容易实现数据共享,比如经典的“生产者”和“消费者”模型中,通过队列可以很便利地实现两者之间的数据共享。假设我们有若干生产者线程,另外又有若干个消费者线程。如果生产者线程需要把准备好的数据共享给消费者线程,利用队列的方式来传递数据,就可以很方便地解决他们之间的数据共享问题。但如果生产者和消费者在某个时间段内,万一发生数据处理速度不匹配的情况呢?理想情况下,如果生产者产出数据的速度大于消费者消费的速度,并且当生产出来的数据累积到一定程度的时候,那么生产者必须暂停等待一下(阻塞生产者线程),以便等待消费者线程把累积的数据处理完毕,反之亦然。

适用阻塞队列的好处:多线程操作共同的队列时不需要额外的同步,另外就是队列会自动平衡负载,即那边(生产与消费两边)处理快了就会被阻塞掉,从而减少两边的处理速度差距。当队列中没有数据的情况下,消费者端的所有线程都会被自动阻塞(挂起),直到有数据放入队列。当队列中填满数据的情况下,生产者端的所有线程都会被自动阻塞(挂起),直到队列中有空的位置,线程被自动唤醒。

BlockingQueue的核心方法:

java
1
2
3
4
5
6
7
offer(anObject)								- 表示如果可能的话,将anObject加到BlockingQueue里,即如果BlockingQueue可以容纳,则返回true,否则返回false.(本方法不阻塞当前执行方法的线程)
offer(E o, long timeout, TimeUnit unit) - 可以设定等待的时间,如果在指定的时间内,还不能往队列中加入BlockingQueue,则返回失败。
put(anObject) - 把anObject加到BlockingQueue里,如果BlockQueue没有空间,则调用此方法的线程被阻断直到BlockingQueue里面有空间再继续.
poll(time) - 取走BlockingQueue里排在首位的对象,若不能立即取出,则可以等time参数规定的时间,取不到时返回null;
poll(long timeout, TimeUnit unit) - 从BlockingQueue取出一个队首的对象,如果在指定时间内,队列一旦有数据可取,则立即返回队列中的数据。否则知道时间超时还没有数据可取,返回失败。
take - 取走BlockingQueue里排在首位的对象,若BlockingQueue为空,阻断进入等待状态直到BlockingQueue有新的数据被加入;
drainTo - 一次性从BlockingQueue获取所有可用的数据对象(还可以指定获取数据的个数),通过该方法,可以提升获取数据效率;不需要多次分批加锁或释放锁。

BlockingQueue不接受null元素。试图add、put或offer一个null元素时,某些实现会抛出NullPointerExceptionnull被用作指示poll操作失败的警戒值。

BlockingQueue成员详细介绍:

2.1 ArrayBlockingQueue

基于数组的阻塞队列实现,在ArrayBlockingQueue内部,维护了一个定长数组,以便缓存队列中的数据对象,这是一个常用的阻塞队列,除了一个定长数组外,ArrayBlockingQueue内部还保存着两个整形变量,分别标识着队列的头部和尾部在数组中的位置。

这是一个典型的“有界缓存区”,固定大小的数组在其中保持生产者插入的元素和使用者提取的元素。一旦创建了这样的缓存区,就不能再增加其容量。试图向已满队列中放入元素会导致放入操作受阻塞;试图从空队列中检索元素将导致类似阻塞。

ArrayBlockingQueue在生产者放入数据和消费者获取数据,都是共用同一个锁对象,由此也意味着两者无法真正并行运行,这点尤其不同于LinkedBlockingQueue;按照实现原理来分析,ArrayBlockingQueue完全可以采用分离锁,从而实现生产者和消费者操作的完全并行运行。Doug Lea之所以没这样去做,也许是因为ArrayBlockingQueue的数据写入和获取操作已经足够轻巧,以至于引入独立的锁机制,除了给代码带来额外的复杂性外,其在性能上完全占不到任何便宜。 ArrayBlockingQueueLinkedBlockingQueue间还有一个明显的不同之处在于,前者在插入或删除元素时不会产生或销毁任何额外的对象实例,而后者则会生成一个额外的Node对象。这在长时间内需要高效并发地处理大批量数据的系统中,其对于GC的影响还是存在一定的区别。而在创建ArrayBlockingQueue时,我们还可以控制对象的内部锁是否采用公平锁,默认采用非公平锁。

java
1
2
3
4
5
6
7
8
9
10
11
12
13
14
15
16
17
18
19
20
21
22
23
/** The queued items */
final Object[] items;

/** items index for next take, poll, peek or remove */
int takeIndex;

/** items index for next put, offer, or add */
int putIndex;

/** Number of elements in the queue */
int count;

/*
* Concurrency control uses the classic two-condition algorithm
* found in any textbook.
*/

/** Main lock guarding all access */
final ReentrantLock lock;
/** Condition for waiting takes */
private final Condition notEmpty;
/** Condition for waiting puts */
private final Condition notFull;

我们稍微来研究下这些成员变量的含义:

  • items:就是队列中的所有对象;
  • takeIndex:是标记下一次takepollpeekremove的下标;
  • putIndex:是标记下一次putofferadd的下标;
  • count:是队列中的对象个数;
  • lock:是保护所有访问的锁
  • notEmpty:控制所有等待的取操作;
  • notFull:控制所有等待的放操作。

其中,ArrayBlockingQueue的所有主要的操作,都是用lock来控制。而notEmptynotFull接下来会有进一步的分析。

我们再来看一下ArrayBlockingQueue的构造函数

java
1
2
3
4
5
6
7
8
9
10
11
12
public ArrayBlockingQueue(int capacity) {
this(capacity, false);
}

public ArrayBlockingQueue(int capacity, boolean fair) {
if (capacity <= 0)
throw new IllegalArgumentException();
this.items = new Object[capacity];
lock = new ReentrantLock(fair);
notEmpty = lock.newCondition();
notFull = lock.newCondition();
}

其中,参数capacity是来定义整个Array的大小,fair是来决定否采用公平锁。从默认构造函数可以看出,默认是采用非公平锁。

java
1
2
3
public ReentrantLock(boolean fair) {
sync = fair ? new FairSync() : new NonfairSync();
}

对于FairSync NonfairSync的分析请参考备注

接下来,我们来看一下put方法,

java
1
2
3
4
5
6
7
8
9
10
11
12
public void put(E e) throws InterruptedException {
checkNotNull(e);
final ReentrantLock lock = this.lock;
lock.lockInterruptibly();
try {
while (count == items.length)
notFull.await();
insert(e);
} finally {
lock.unlock();
}
}

因为ArrayBlockingQueue不允许插入null,所以首先会调用checkNotNull来判断e是否为null,如果是null,就直接抛出NullPointerException。然后locklockInterruptibly方法,以便在加锁后允许线程被中断。接下来就来判断是否有空间来插入新的对象。如果有空间,则直接插入。如果没有空间,则会调用notFullawait方法,进行等待,直到有出现空余空间。

当调用notFullawait方法的时候,就会自动释放之前占有的lock,并且当前线程会被暂停,直到别的线程调用这ConditionsignalsignalAll方法,或者中断当前线程。
这里不能是使用lock方法。对于lockInterruptibly方法和lock方法的分析,请参考备注

一旦如果有空间,则调用insert方法插入新对象。

java
1
2
3
4
5
6
private void insert(E x) {
items[putIndex] = x;
putIndex = inc(putIndex);
++count;
notEmpty.signal();
}

insert方法中,值得关注的是调用了notEmptysignal方法,来唤醒等待的线程。

2.2 LinkedBlockingQueue

链接队列的吞吐量通常要高于基于数组的队列,但是在大多数并发应用程序中,其可预知的性能要低。可选的容量范围构造方法参数作为防止队列过度扩展的一种方法。如果未指定容量,则它等于Integer.MAX_VALUE。除非插入节点会使队列超出容量,否则每次插入后会动态地创建链接节点。

基于链表的阻塞队列,同ArrayListBlockingQueue类似,其内部也维持着一个数据缓冲队列(该队列由一个链表构成),当生产者往队列中放入一个数据时,队列会从生产者手中获取数据,并缓存在队列内部,而生产者立即返回;只有当队列缓冲区达到最大值缓存容量时(LinkedBlockingQueue可以通过构造函数指定该值),才会阻塞生产者队列,直到消费者从队列中消费掉一份数据,生产者线程会被唤醒,反之对于消费者这端的处理也基于同样的原理。而LinkedBlockingQueue之所以能够高效的处理并发数据,还因为其对于生产者端和消费者端分别采用了独立的锁来控制数据同步,这也意味着在高并发的情况下生产者和消费者可以并行地操作队列中的数据,以此来提高整个队列的并发性能。

作为开发者,我们需要注意的是,如果构造一个LinkedBlockingQueue对象,而没有指定其容量大小,LinkedBlockingQueue会默认一个类似无限大小的容量(Integer.MAX_VALUE),这样的话,如果生产者的速度一旦大于消费者的速度,也许还没有等到队列满阻塞产生,系统内存就有可能已被消耗殆尽了。

接下来,我们就来参看下LinkedBlockingQueue的源代码,看看它的魔法藏在哪里。

首先,我们先看一下它的成员变量:

java
1
2
3
4
5
6
7
8
9
10
11
12
13
14
15
16
17
18
19
20
21
22
23
24
25
26
27
28
29
/** The capacity bound, or Integer.MAX_VALUE if none */
private final int capacity;

/** Current number of elements */
private final AtomicInteger count = new AtomicInteger(0);

/**
* Head of linked list.
* Invariant: head.item == null
*/
private transient Node<E> head;

/**
* Tail of linked list.
* Invariant: last.next == null
*/
private transient Node<E> last;

/** Lock held by take, poll, etc */
private final ReentrantLock takeLock = new ReentrantLock();

/** Wait queue for waiting takes */
private final Condition notEmpty = takeLock.newCondition();

/** Lock held by put, offer, etc */
private final ReentrantLock putLock = new ReentrantLock();

/** Wait queue for waiting puts */
private final Condition notFull = putLock.newCondition();

在LinkedBlockingQueue的所有共享的全局变量中,final声明的capacity在构造器生成实例时就成了不变量了。而final声明的count由于是AtomicInteger类型的,所以能够保证其操作的原子性。剩下的final的变量都是初始化成了不变量,并且不包含可变属性,所以都是访问安全的。那么剩下的就是Node类型的head和last两个可变量。所以要保证LinkedBlockingQueue是线程安全的就是要保证对head和last的访问是线程安全的。

接下来,我们来看一下LinkedBlockingQueue的构造函数:

java
1
2
3
4
5
6
7
8
9
public LinkedBlockingQueue() {
this(Integer.MAX_VALUE);
}

public LinkedBlockingQueue(int capacity) {
if (capacity <= 0) throw new IllegalArgumentException();
this.capacity = capacity;
last = head = new Node<E>(null);
}

从默认构造函数可以看到,LinkedBlockingQueue会默认一个容量为Integer.MAX_VALUE的队列。当使用默认构造函数的时候,我们就必须小心处理,以免造成内存被消耗殆尽。

LinkedBlockingQueue的实现与ArrayBlockingQueue的实现类似,只是使用两个可重入锁takeLockputLock来保证线程安全性,这里就不再详细分析了,感兴趣的读者可以自行去阅读LinkedBlockingQueue的源代码。

ArrayBlockingQueueLinkedBlockingQueue是两个最普通也是最常用的阻塞队列,一般情况下,在处理多线程间的生产者消费者问题,使用这两个类足以。

2.3 DelayQueue

DelayQueue中的元素只有当其指定的延迟时间到了,才能够从队列中获取到该元素。DelayQueue是一个没有大小限制的队列,因此往队列中插入数据的操作(生产者)永远不会被阻塞,而只有获取数据的操作(消费者)才会被阻塞。

使用场景:DelayQueue使用场景较少,但都相当巧妙,常见的例子比如使用一个DelayQueue来管理一个超时未响应的连接队列。

2.4 PriorityBlockingQueue

基于优先级的阻塞队列(优先级的判断通过构造函数传入的Compator对象来决定),但需要注意的是PriorityBlockingQueue并不会阻塞数据生产者,而只会在没有可消费的数据时,阻塞数据的消费者。因此使用的时候要特别注意,生产者生产数据的速度绝对不能快于消费者消费数据的速度,否则时间一长,会最终耗尽所有的可用堆内存空间。在实现PriorityBlockingQueue时,内部控制线程同步的锁采用的是公平锁。

2.5 SynchronousQueue

一种无缓冲的等待队列,类似于无中介的直接交易,有点像原始社会中的生产者和消费者,生产者拿着产品去集市销售给产品的最终消费者,而消费者必须亲自去集市找到所要商品的直接生产者,如果一方没有找到合适的目标,那么对不起,大家都在集市等待。相对于有缓冲的BlockingQueue来说,少了一个中间经销商的环节(缓冲区),如果有经销商,生产者直接把产品批发给经销商,而无需在意经销商最终会将这些产品卖给那些消费者,由于经销商可以库存一部分商品,因此相对于直接交易模式,总体来说采用中间经销商的模式会吞吐量高一些(可以批量买卖);但另一方面,又因为经销商的引入,使得产品从生产者到消费者中间增加了额外的交易环节,单个产品的及时响应性能可能会降低。

声明一个SynchronousQueue有两种不同的方式,它们之间有着不太一样的行为。公平模式和非公平模式的区别:

  • 如果采用公平模式:SynchronousQueue会采用公平锁,并配合一个FIFO队列来阻塞多余的生产者和消费者,从而体系整体的公平策略;
  • 但如果是非公平模式(SynchronousQueue默认),SynchronousQueue就会采用非公平锁,同时配合一个LIFO队列来管理多余的生产者和消费者。

对于第二种模式,如果生产者和消费者的处理速度有差距,则很容易出现饥渴的情况,即可能有某些生产者或者是消费者的数据永远都得不到处理。

其他

CopyOnWriteArrayList & CopyOnWriteArraySet

通过名字,我们大致可以知道CopyOnWriteArrayListCopyOnWriteArraySet的原理是基本相同的,因此这里我们只针对CopyOnWriteArrayList来进行分析。

ps:实际上,CopyOnWriteArraySet是基于CopyOnWriteArrayList,只是在CopyOnWriteArrayList的外面多增加了一层封装,来保持元素的为唯一性。

1
2
3
4
5
6
public class CopyOnWriteArrayList<E>
implements List<E>, RandomAccess, Cloneable, java.io.Serializable {
transient final ReentrantLock lock = new ReentrantLock();
private volatile transient Object[] array;

}

CopyOnWriteArrayList主要有两个属性:一个可重入锁lock和一组Object数组array。由于arrayprivate,所以只能通过getArray或者setArray方法来访问底层的数组array

1
2
3
4
5
6
7
final Object[] getArray() {
return array;
}

final void setArray(Object[] a) {
array = a;
}

对集合类来说,最为基本的操作是插入操作和删除操作。因此接下来我们来看一下CopyOnWriteArrayList的插入操作(由于删除操作的实现基本相似,这里就不进行分析):

1
2
3
4
5
6
7
8
9
10
11
12
13
14
public boolean add(E e) {
final ReentrantLock lock = this.lock;
lock.lock();
try {
Object[] elements = getArray();
int len = elements.length;
Object[] newElements = Arrays.copyOf(elements, len + 1);
newElements[len] = e;
setArray(newElements);
return true;
} finally {
lock.unlock();
}
}

根据add方法的实现,我们可以发现,对CopyOnWriteArrayList的插入操作都是在array数组的拷贝上进行。因此,CopyOnWriteArrayList的关键点在于:不管是添加或者删除CopyOnWriteArrayList中的项,这些操作都是在底层的数组的拷贝上进行修改。也就是说,你每修改一次数组,就会生成一个拷贝。因此如果经常修改数组的话,会影响CopyOnWriteArrayList的性能。

基于这样的实现,如果某个线程修改了共享的CopyOnWriteArrayList,其他的线程所持有的拷贝数组是不会随之改变的,这些变化对其他线程来说是不可见的。

另外,如果你尝试对CopyOnWriteArrayList进行排序,则会抛出UsupportedOperationException异常,因为排序需要对数组进行N次修改,所以CopyOnWriteArrayList本身是不支持排序的。

备注

PS:部分内容参考了DA MichaelPeng关于ReentrantLock的博文

lockInterruptibly & lock

ReentrantLock.lockInterruptibly允许在等待时由其它线程调用等待线程的Thread.interrupt方法来中断等待线程的等待而直接返回,这时不用获取锁,而会抛出一个InterruptedException。而ReentrantLock.lock方法不允许Thread.interrupt中断,即使检测到Thread.isInterrupted,一样会继续尝试获取锁,失败则继续休眠。只是在最后获取锁成功后再把当前线程置为interrupted状态。

那lockInterruptibly是如何做到这一点的呢?

java
1
2
3
public void lockInterruptibly() throws InterruptedException {
sync.acquireInterruptibly(1);
}

这里调用了AbstractQueuedSynchronizeracquireInterruptibly方法。如果线程已被中断则直接抛出异常,否则则尝试获取锁,失败则doAcquireInterruptibly

java
1
2
3
4
5
6
7
8
9
10
11
12
13
14
15
16
17
18
19
20
/**
* Acquires in exclusive mode, aborting if interrupted.
* Implemented by first checking interrupt status, then invoking
* at least once {@link #tryAcquire}, returning on
* success. Otherwise the thread is queued, possibly repeatedly
* blocking and unblocking, invoking {@link #tryAcquire}
* until success or the thread is interrupted. This method can be
* used to implement method {@link Lock#lockInterruptibly}.
*
* @param arg the acquire argument. This value is conveyed to
* {@link #tryAcquire} but is otherwise uninterpreted and
* can represent anything you like.
* @throws InterruptedException if the current thread is interrupted
*/
public final void acquireInterruptibly(int arg) throws InterruptedException {
if (Thread.interrupted())
throw new InterruptedException();
if (!tryAcquire(arg))
doAcquireInterruptibly(arg);
}

AbstractQueuedSynchronizer.doAcquireInterruptibly大体上相当于前面的acquireQueued,关键的区别在于检测到interrupted后的处理,acquireQueued简单的记录下中断曾经发生,然后就像没事似的去尝试获取锁,失败则休眠。而doAcquireInterruptibly检测到中断则直接退出循环,抛出InterruptedException异常。

java
1
2
3
4
5
6
7
8
9
10
11
12
13
14
15
16
17
18
19
20
21
22
23
24
25
26
27
28
29
30
31
32
33
34
/**
* Acquires in exclusive interruptible mode.
* @param arg the acquire argument
*/
private void doAcquireInterruptibly(int arg)
throws InterruptedException {
final Node node = addWaiter(Node.EXCLUSIVE);
try {
for (;;) {
final Node p = node.predecessor();
if (p == head && tryAcquire(arg)) {
setHead(node);
p.next = null; // help GC
return;
}
/*
acquireQueued代码:
if (shouldParkAfterFailedAcquire(p, node) &&
parkAndCheckInterrupt())
interrupted = true;
*/
if (shouldParkAfterFailedAcquire(p, node) &&
parkAndCheckInterrupt())
break;
}
} catch (RuntimeException ex) {
cancelAcquire(node);
throw ex;
}
// Arrive here only if interrupted
// 取消获取锁尝试,将当前节点从等待队列中移除
cancelAcquire(node);
throw new InterruptedException();
}

在抛出异常之前,doAcquireInterruptibly还做了一件事情,cancelAcquire。cancelAcquire中有些细节值得玩味,参见代码中笔者注释。

java
1
2
3
4
5
6
7
8
9
10
11
12
13
14
15
16
17
18
19
20
21
22
23
24
25
26
27
28
29
30
31
32
33
34
35
36
37
38
39
private void cancelAcquire(Node node) {
// Ignore if node doesn't exist
if (node == null)
return;

node.thread = null;

// Skip cancelled predecessors
// 头节点一定不会是在等待状态,所以不会被cancel,所以这里一定能找到一个节点而不用担心null
Node pred = node.prev;
while (pred.waitStatus > 0)
node.prev = pred = pred.prev;

// Getting this before setting waitStatus ensures staleness
Node predNext = pred.next;
// Can use unconditional write instead of CAS here
node.waitStatus = Node.CANCELLED;

// If we are the tail, remove ourselves
if (node == tail && compareAndSetTail(node, pred)) {
compareAndSetNext(pred, predNext, null);
} else {
// If "active" predecessor found...
if (pred != head
&& (pred.waitStatus == Node.SIGNAL
|| compareAndSetWaitStatus(pred, 0, Node.SIGNAL))
&& pred.thread != null) {

// If successor is active, set predecessor's next link
Node next = node.next;
if (next != null && next.waitStatus <= 0)
compareAndSetNext(pred, predNext, next);
} else {
/*这里如果不调用unparkSuccessor, 若在interrupted之后,执行到上面一句将waitStatus置CANCELLED之前,锁被释放,该线程被唤醒,则释放锁线程的unparkSuccessor不能起到预期作用,所以这里需要调用unparkSuccessor.即使此时持有锁的线程没有释放锁也不会有严重后果,被unpark的线程在获取锁失败后会继续park*/
unparkSuccessor(node);
}
node.next = node; // help GC
}
}

ReentrantLock

ReentrantLockjava.util.concurrent.locks中的一个可重入锁类,实现了LockSerializable接口。在高竞争条件下有更好的性能,且可以中断。

我们先来看ReentrantLock最常用的代码lock

java
1
2
3
public void lock() {
sync.lock();
}

很简单,只是直接调用了成员变量的synclock方法

java
1
2
/** Synchronizer providing all implementation mechanics */
private final Sync sync;

从注释中,可以看到sync实现了所有的实现机制,而ReentrantLock只是转发请求而已。

SyncReentrantLock的静态内部类,并且继承了AbstractQueuedSynchronizer类。Sync有两个子类:FairSync公平锁和NonFairSync非公平锁,

1)如果锁是公平锁,当锁已经被其他线程占有时,新的请求线程会加入到等待队列,按照请求顺序来获得锁。
2)如果锁是非公平锁,线程可以闯入,当锁的状态可用,请求非公平锁的线程可在等待队列中向前跳跃,获得该锁。如果尝试失败,则再采用类似公平锁的那种方式。

为了更深入地理解整个的机制,我们不妨从它们的实现代码来窥探整个获取锁的过程。

首先,作为最核心的类AbstractQueuedSynchronizer,有三个最重要的成员变量:

java
1
2
3
4
5
6
7
8
9
10
11
12
13
14
15
16
17
18
19
20
21
22
23
/**
* Head of the wait queue, lazily initialized. Except for
* initialization, it is modified only via method setHead. Note:
* If head exists, its waitStatus is guaranteed not to be
* CANCELLED.
*/
private transient volatile Node head;

/**
* Tail of the wait queue, lazily initialized. Modified only via
* method enq to add new wait node.
*/
private transient volatile Node tail;

/**
* The synchronization state.
*/
private volatile int state;

/**
* The synchronization state.
*/
private volatile int state;

其中,state变量记录了当前锁被锁定的次数。如果state为0,则表示锁未被锁定。为了保证更新操作的原子性,更改state状态主要由函数compareAndSetState来实现。

java
1
2
3
4
protected final boolean compareAndSetState(int expect, int update) {
// See below for intrinsics setup to support this
return unsafe.compareAndSwapInt(this, stateOffset, expect, update);
}

只有当如果state值为expect,则更新为update值且返回true,否则不更改state且返回false

通常,我们不会直接使用到AbstractQueuedSynchronizer,而是NonfairSyncFairSync

所以我们不妨先从NonfairSync入手。

下面是NonfairSync的实现代码:

java
1
2
3
4
5
6
7
8
9
10
11
12
13
14
15
16
17
18
static final class NonfairSync extends Sync {
private static final long serialVersionUID = 7316153563782823691L;

/**
* Performs lock. Try immediate barge, backing up to normal
* acquire on failure.
*/
final void lock() {
if (compareAndSetState(0, 1))
setExclusiveOwnerThread(Thread.currentThread());
else
acquire(1);
}

protected final boolean tryAcquire(int acquires) {
return nonfairTryAcquire(acquires);
}
}

从中,可以看到在lock方法中,调用了AbstractQueuedSynchronizeracquire方法:

java
1
2
3
4
5
public final void acquire(int arg) {
if (!tryAcquire(arg) &&
acquireQueued(addWaiter(Node.EXCLUSIVE), arg))
selfInterrupt();
}

acquire方法中,会再次尝试加锁,如果再次失败则会加入等待队列,并禁用当前线程,直到被中断或有线程释放锁时被唤醒:

java
1
2
3
private static void selfInterrupt() {
Thread.currentThread().interrupt();
}

SyncnonfairTryAcquire方法的实现如下:

java
1
2
3
4
5
6
7
8
9
10
11
12
13
14
15
16
17
18
19
20
21
final boolean nonfairTryAcquire(int acquires) {
final Thread current = Thread.currentThread();
int c = getState();
if (c == 0) {
// 如果c为0,那就代表当前锁空闲
// 然后就尝试锁定,如果成功的设当前的线程为锁的拥有者
if (compareAndSetState(0, acquires)) {
setExclusiveOwnerThread(current);
return true;
}
}
else if (current == getExclusiveOwnerThread()) {
// 如果当前线程是锁的拥有者,因为是可重入锁,所以就直接修改锁的状态
int nextc = c + acquires;
if (nextc < 0) // overflow
throw new Error("Maximum lock count exceeded");
setState(nextc);
return true;
}
return false;
}

tryAcquire失败后,首先调用AbstractQueuedSynchronizeraddWaiter方法将当前线程加入等待队列尾部,然后调用AbstractQueuedSynchronizeracquireQueued方法让线程进入禁用状态,并在每次被唤醒时尝试获取锁,失败则继续禁用线程。

java
1
2
3
4
5
6
7
8
9
10
11
12
13
14
15
16
17
18
19
20
21
22
23
final boolean acquireQueued(final Node node, int arg) {
try {
boolean interrupted = false;
for (;;) {
// 如果当前线程是head的直接后继则尝试获取锁
// 这里不会和等待队列中其它线程发生竞争,但会和尝试获取锁且尚未进入等待队列的线程发生竞争。这是非公平锁和公平锁的一个重要区别。
final Node p = node.predecessor();
if (p == head && tryAcquire(arg)) {
setHead(node);
p.next = null; // help GC
return interrupted;
}
// 如果不是head直接后继或获取锁失败,则检查是否要禁用当前线程
// 是则禁用,直到被lock.release唤醒或线程中断
if (shouldParkAfterFailedAcquire(p, node) &&
parkAndCheckInterrupt())
interrupted = true;
}
} catch (RuntimeException ex) {
cancelAcquire(node);
throw ex;
}
}

最后我们再来看一下FairSynctryAcquire方法:

java
1
2
3
4
5
6
7
8
9
10
11
12
13
14
15
16
17
18
19
protected final boolean tryAcquire(int acquires) {
final Thread current = Thread.currentThread();
int c = getState();
if (c == 0) {
if (!hasQueuedPredecessors() &&
compareAndSetState(0, acquires)) {
setExclusiveOwnerThread(current);
return true;
}
}
else if (current == getExclusiveOwnerThread()) {
int nextc = c + acquires;
if (nextc < 0)
throw new Error("Maximum lock count exceeded");
setState(nextc);
return true;
}
return false;
}

实现与SyncnonfairTryAcquire方法非常类似,除了多了一个判断hasQueuedPredecessors(),是用来确保队列中的线程是按照请求顺序来获取锁。